UX CASE STUDY
Workflow Automator
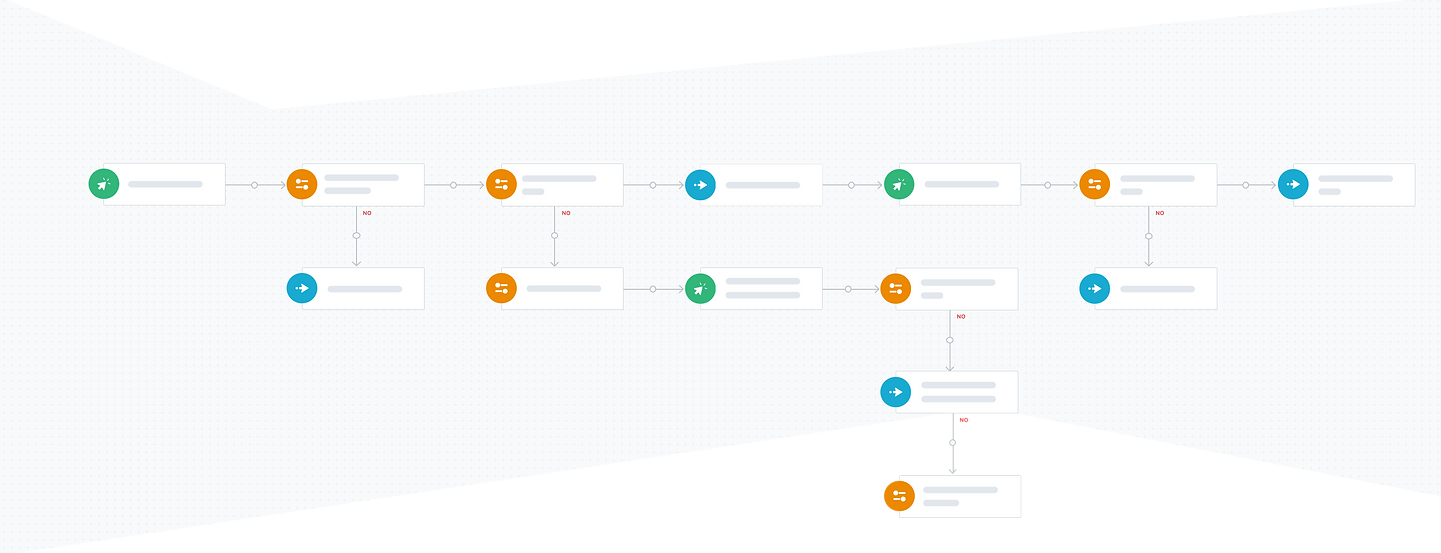
Workflow Automator helps automate all the repetitive tasks and manual processes that the user perform on a daily basis.
In March, 2018, The introduction of Workflow automator in Freshservice was very well received and has been very positive among our users with the robust automation now possible on Freshservice.
"Not having this feature had kept us away from the magic quadrant (comment from field teams)"
I was a part of this ambitious project to re-think and design a robust automation experience for the IT admins, which was once a strenuous task.
Overview
Automations increase the service desk efficiency exponentially and hence IT admins go through a complex configuration process to set up service desk automation rules in the existing service desk. With Workflow Automator it becomes a lot easier to configure automations end to end, with cascading rules giving admins a birds eye view of the entire process.
Workflow Automator is powered by visually appealing workflow engine. This helps in boosting efficiency and eliminating mundane service desk tasks.
The focus is on making the entire process of creation and maintenance of a workflow a breeze and to provide a single place where these workflows can be visualised end-to-end.
The Problem
Form like structure - The existing automation rules are non graphical, and live across multiple modules thus, not providing a birds eye view of the entire automation process. This also adds up to the difficulty when we want to edit which might break the rule somewhere.
Scalability - Our current automation does not scale well for mid market customers as service desks become larger and more complex, which in turn make the user create multiple rules to define a workflow. We have seen a surge in number of rules primarily due to duplication, given the complexity of workflows these rules achieve. E.g, one customer (riverbed) alone has close to 600 rules.
Complex UI - Most users of the current automations are done by the techie IT users and the core IT teams, who creates and manages complex rules.
The Goal
The main goal here is to allow users to easily create complex workflow rules which provides the user with a birds eye view of the entire process in a single workflow. To reduce the number of workflows and to accommodate multiple actions in one single workflow. Above all, a graphical representation to configure automations by just creating flow diagrams.
By simplifying the workflow creation process we aim to make it super easy for non-IT teams to have light weight automated team specific flows. For example: Referral Screening and Employee Onboarding workflows for HR teams.
My Role
I led the design and was responsible for the experience strategy and the design for the Workflow Automator. I worked alongside a Product Manager, a Solution Architect, and at a later stage I collaborated with another designer and a Content Strategist.
I lead the UX work, from conceptualisation to execution by providing hi fidelity mocks. IA, flow diagrams, Brainstorming, content inventories, taxonomies, mockups.
Gathering Initial Insights
PRELIMINARY RESEARCH
Taking a user-centered approach, I focused on figuring out exactly where the problems lied with the features current user experience, and where I could make improvements to best meet the users' needs.
Domain Research
With the help of data, and user interviews, the following were analysed:
-
Count - The maximum number of automation rules maintained by one customer was around 600 rules
-
Duplicated Rules - About 37 % of accounts have same rules duplicated
-
User Perception - Novice users struggled to understand the rules as they were maintained in different section and these users never really figured out the entire rule.
-
Ease of use - Users without technical expertise found it difficult to configure a workflow.
Understanding the User's Behaviours & Motivations
USER INTERVIEWS
In order to make more informed decisions, I needed to understand the experiences people face, So I interviewed people in Customer Success team who usually help configure automation rules for most of the customers and identified the following critical issues faced.
-
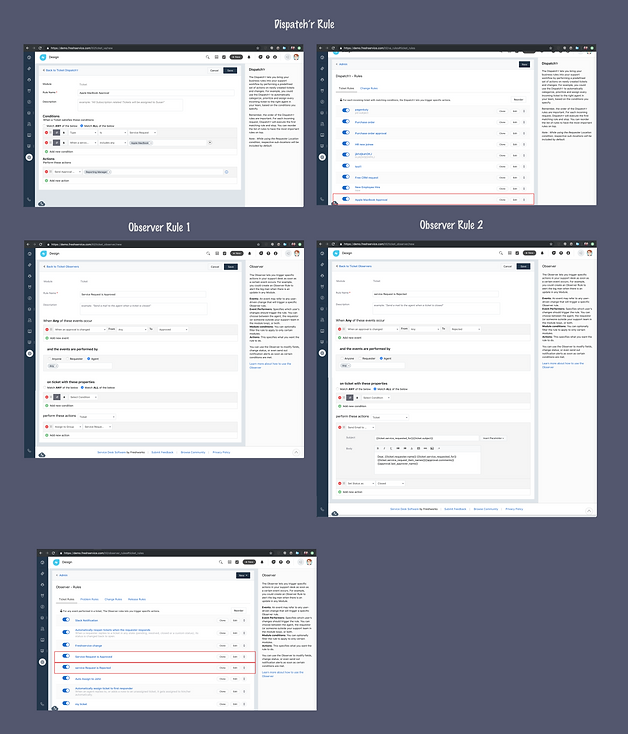
Users often jump between dispatch'r rules and observer rules to understand how the configured rule actually works. Dispatch'r Rule is the rule which is performed on a newly created tickets, on the other hand, an Observer Rule is a set of actions which is performed when certain events occurs on the ticket.
-
Dedicated admins for creating and maintaining the Rules - Since the rules created was in multiple places and, it was difficult by another user to interpret them, So the creation and maintenance of these rules were only managed by dedicated users.
-
No graphical visualisation
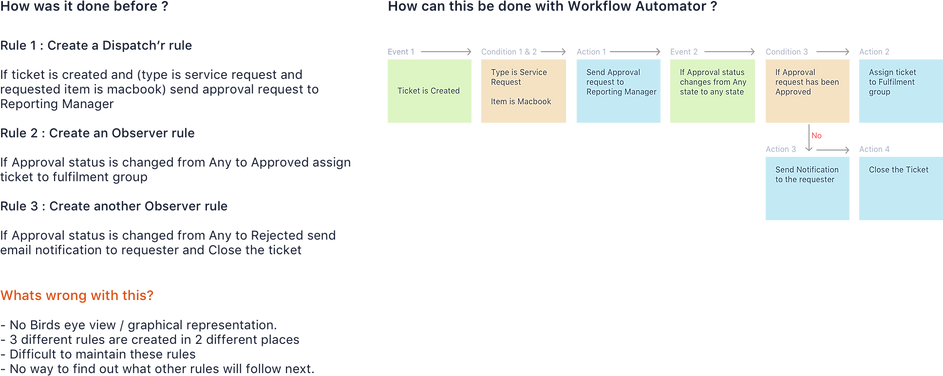
For example: Approval Process for a service request
Rule 1 Dispatch’r Rule - If ticket is created and (type is service request and requested item is Macbook) send approval request to Reporting Manager
Rule 2 Observer Rule - If Approval status is changed from Any to Approved assign ticket to fulfilment group
Rule 3 Observer Rule - If Approval status is changed from Any to Rejected send email notification to requester and Close the ticket
Key Findings
RE-THINKING THE PROBLEMS
We arrived at the most important findings which we need to address
1. Rules were created in multiple places which lead to duplication of the same rules.
2. There is no one single place to see how the entire rules flow
3. Creating and Maintaining seemed to be a difficult and boring task.
Competitor Analysis
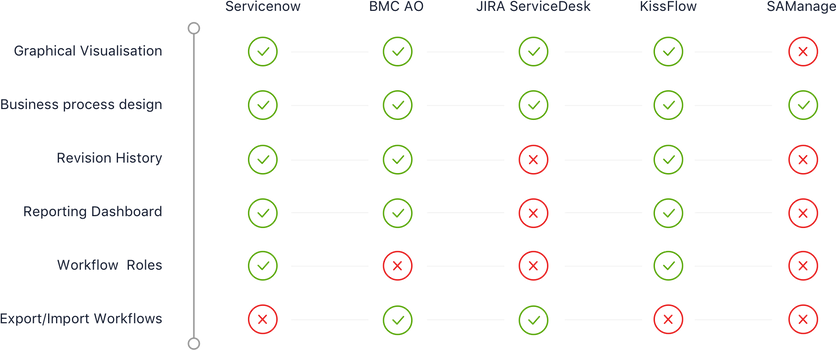
We analysed some of our competitors and gathered on the following:
After creating the competitor analysis, it became apparent that the key distinction between FS automation rules and the rules currently available in other products is that most products has a graphical representation for their automation rules and a proper business process design in place.
PERSONAS
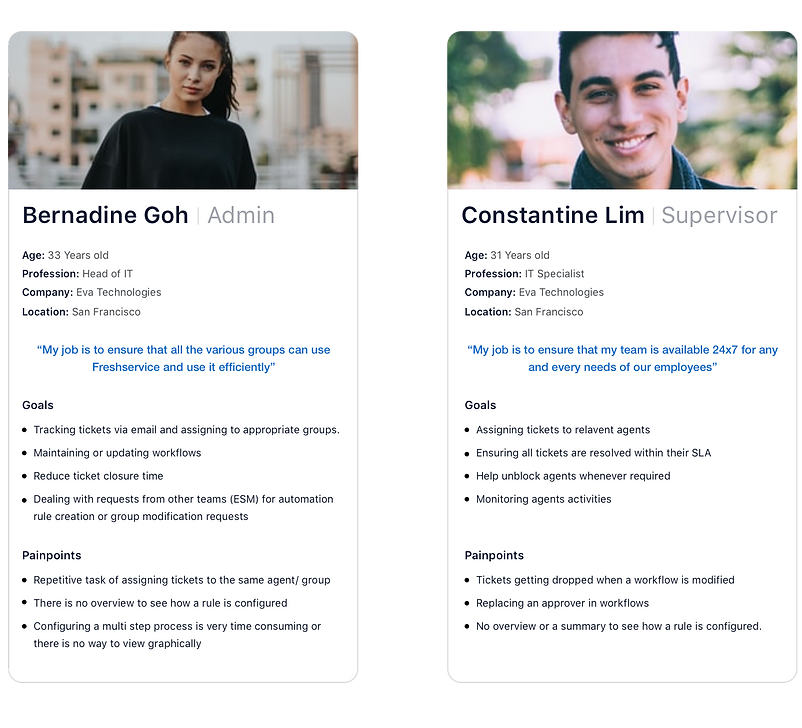
Our users are mainly the Admins and Supervisors
Idea to Prototype (i2P)
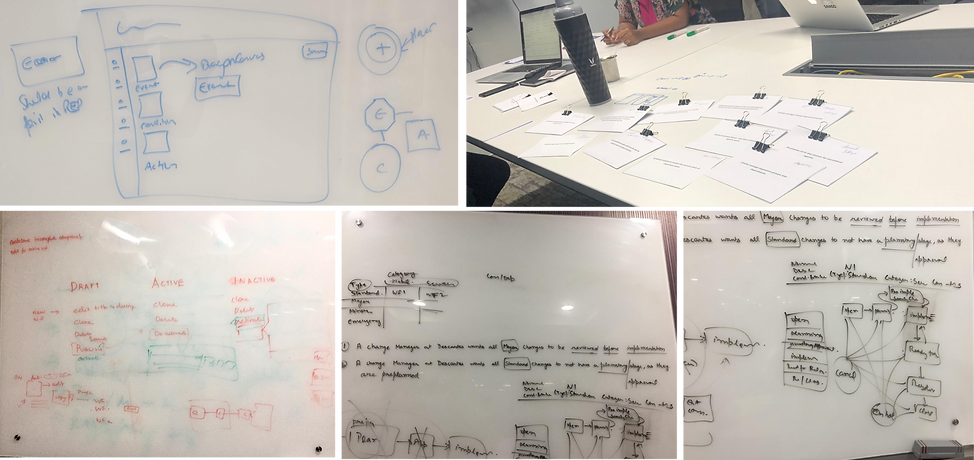
The initial phase of our ideation process is the i2P meeting, during which the Product Managers, Product Designer and the Tech Lead come together to brainstorm the idea.
This phase is very important because it helps us analyse the technical difficulties and functionality of the feature which if not identified in the very beginning leads to rework, wrong understanding, etc...During this phase, we will understand the problem and try to provide solutions in the whiteboard, this might not be the solution itself, but it helps all of us to think about the problem. This is considered a quick method to get started and at the end of this i2P meeting, we get a clear picture of what we are going to build.
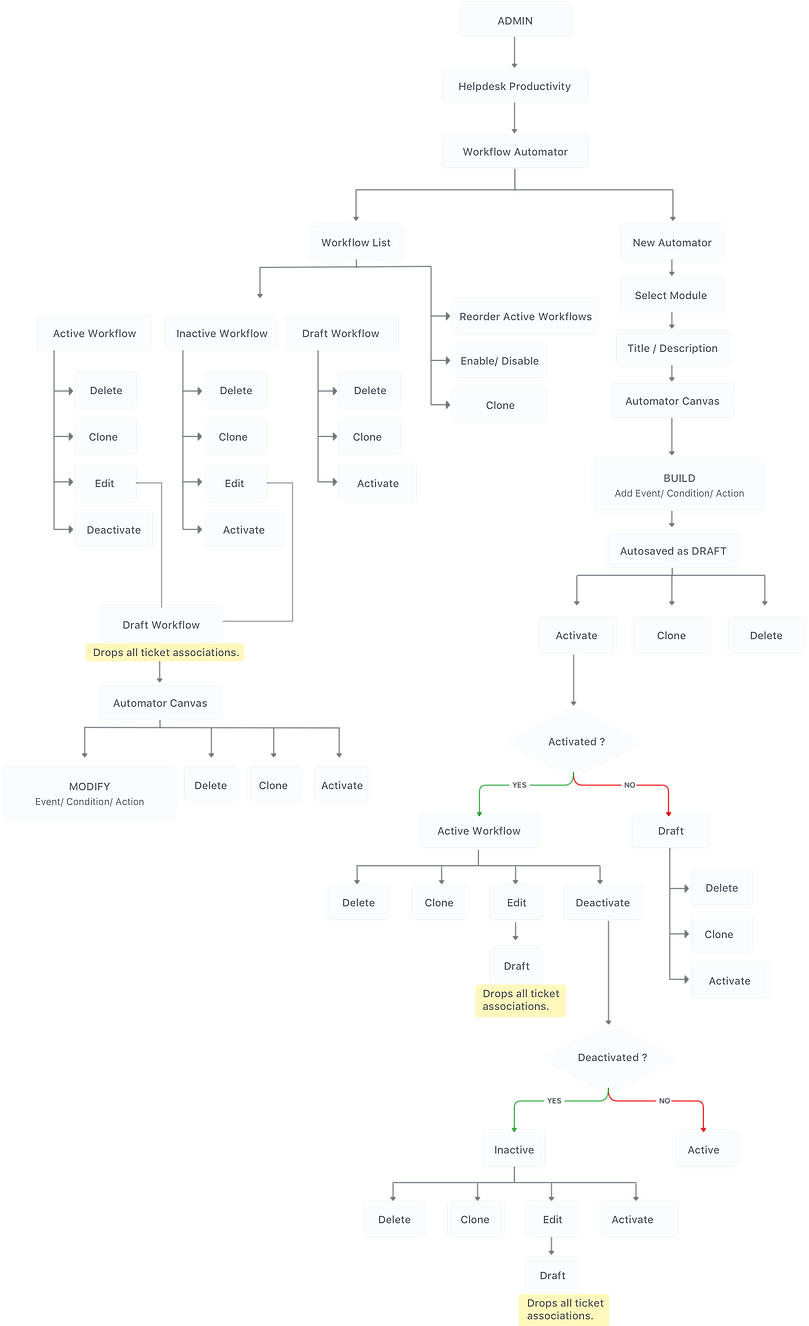
Information Architecture
IDEATION
Anatomy of the Workflow Automator
An Automation rule follows this flow "If an Event happens and certain Conditions are met, then perform the Action", here, the Event, Conditions and Actions are the main building blocks of the workflow.

Event - defines when a workflow has to be triggered
Condition - defines the parameter(s) that needs to be validated during the execution of a workflow
Action - The outcome of the workflow
WIREFRAMING
Laying Out the Content & Functionality
After brainstorming and finalising how the anatomy should flow, I created simple wireframes to coordinate the hierarchy of items. These wireframes helped communicate how the rule can be configured according to the user's needs. Originally I started with small sketches of different ideas, which then grew as I continued these wireframes in Balsamiq.
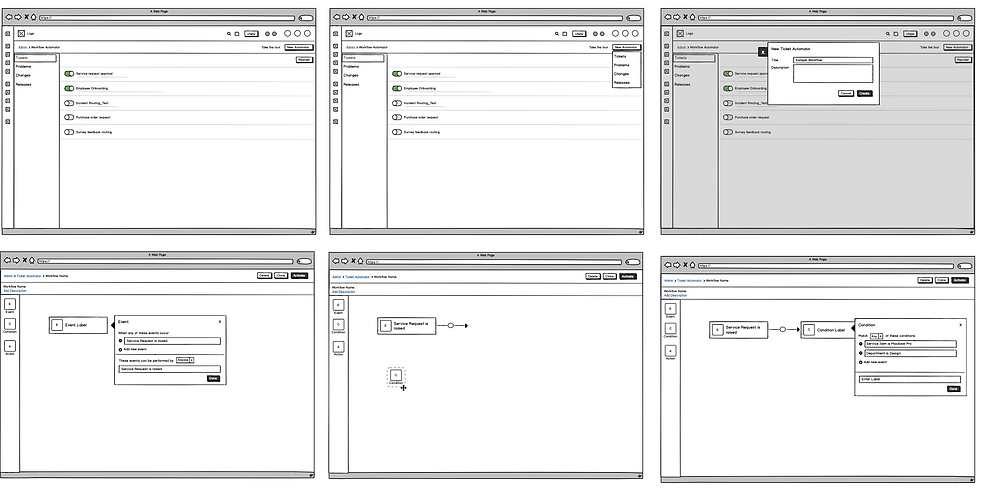
The biggest challenge I faced was designing an experience for users to configure the Event or Conditions or Actions unlike the usual form filling experience. The existing configuration contained a form like structure where users kept adding multiple conditions. A new component was introduced which helped users configure conditions seamlessly and with much reduced clicks which in turn reduced the time taken for configuring event, conditions and actions.
I take the pride in telling that this new component, which I introduced is now added to the DSM of freshworks and is used widely :)
The initial interactive prototype, done using Axure RP showcases how the component will work.
Components for different types of fields were designed in sketch
VISUAL DESIGN
Designing the look and feel
The UI design required a lot of continuous feedback and retesting to create the final product. We made different versions to depict the flow.

Different visual design concepts
FINAL DESIGN
Putting it All Together
With all the work that was put into understanding the users' needs, enhancing and improving the flow, came the final design for Workflow Automator. This redesign tackled all the pain points users were experiencing, focusing mainly on the task of defining rule creation easier in a graphical manner which provides a birds eye view of how the rule flows.
USER MANUAL
Feature tour and Video tutorials
We thought it would be beneficial to add two additional features that weren’t mentioned within our previous discussions.
1) Adding a customer on-boarding process — With the help of inline manual tool, showing the users how to utilize their new workflow automator
2) Adding training and tutorial videos — detailed short videos panel that discusses how the workflow automator can be used.
USAGE METRICS
Measuring Adaption and Impact
175k
Automations created
3.3k
Dispatch'r created
10.5k
Average users/mo
Heap was used to analyse the usage metrics